Docker Compose with Hands-on
Introduction
In today's fast-paced development environment, deploying and managing complex applications can be a daunting task. Coordinating multiple services, ensuring compatibility, and maintaining consistency across different environments can quickly become overwhelming. However, with the advent of Docker Compose, developers have gained a powerful tool for streamlining application deployment and reducing complexity. In this article, we will explore Docker Compose and how it simplifies the process of orchestrating multi-container applications.
What is Docker Compose?
Docker Compose is a tool that allows you to define and manage multi-container Docker applications. It provides a simple YAML file format for describing the services, networks, and volumes required for your application. With Docker Compose, you can define your entire application stack, including dependencies, in a single file, and deploy it with a single command.
Simplifying Application Deployment:
Defining Services: With Docker Compose, you can specify each service required for your application, such as web servers, databases, caching servers, and more, all in a single YAML file. Each service can be configured individually, allowing you to set environment variables, define ports, specify volumes, and more.
Managing Dependencies: In complex applications, managing dependencies between services can be challenging. Docker Compose allows you to define links and networks, ensuring seamless communication between containers. You can easily specify the dependencies of each service, enabling the automatic startup and shutdown of dependent services when needed.
Environment Configuration: Docker Compose simplifies environment configuration by allowing you to define environment variables in the YAML file. This feature enables you to easily switch between different environments, such as development, staging, and production, by specifying environment-specific values without modifying the underlying code.
Easy Scaling: Scaling your application becomes effortless with Docker Compose. By specifying the desired number of replicas for each service, you can easily scale horizontally or vertically, depending on your needs. Docker Compose manages the orchestration and load balancing of containers, making it simple to handle increased traffic or demand.
Reproducible Builds: Docker Compose ensures that your application's deployment remains consistent across different environments. By defining your entire stack in a YAML file, you eliminate the hassle of manually configuring services on different machines. This guarantees that your application behaves the same way in the development, testing, and production environments, reducing the chance of deployment-related issues.
Docker Compose is a powerful tool for simplifying the deployment of multi-container applications. By providing declarative syntax and powerful orchestration capabilities, it enables developers to define and manage complex application stacks effortlessly. With Docker Compose, you can achieve consistency, scalability, and reproducibility in your deployments, saving valuable time and effort. So, embrace the power of Docker Compose and take your application deployment process to the next level.
Running a Flask App with Redis using Docker Compose
In this hands-on tutorial, we will explore how to use Docker Compose to run a Flask application with Redis. Docker Compose is a tool that allows you to define and run multi-container Docker applications. We will containerize our Flask app and Redis using Docker Compose, making it easy to manage and deploy the application.
Setting up the Flask App
First, let's set up the Flask application that we want to run with Redis. Create a new directory for your project and navigate to it in your terminal or command prompt. Inside the project directory, create a file named
app.pyand paste the following code:import time import redis from flask import Flask app = Flask(__name__) cache = redis.Redis(host='redis', port=6379) def get_hit_count(): retries = 5 while True: try: return cache.incr('hits') except redis.exceptions.ConnectionError as exc: if retries == 0: raise exc retries -= 1 time.sleep(0.5) @app.route('/') def hello(): count = get_hit_count() return 'Hello World! I have been seen {} times.\n'.format(count)
Next, create a file named requirements.txt in the same directory and add the following content:
Flask
redis
These requirements will be used to install Flask and Redis dependencies when building the Docker image.
Creating the Dockerfile
To containerize our Flask app, we need to create a Dockerfile. In the same project directory, create a file named Dockerfile and paste the following code:
# syntax=docker/dockerfile:1
FROM python:3.7-alpine
WORKDIR /code
ENV FLASK_APP=app.py
ENV FLASK_RUN_HOST=0.0.0.0
RUN apk add --no-cache gcc musl-dev linux-headers
COPY requirements.txt requirements.txt
RUN pip install -r requirements.txt
EXPOSE 5000
COPY . .
CMD ["flask", "run"]
The Dockerfile sets up the necessary environment, installs dependencies from requirements.txt, exposes port 5000 (the default Flask port), and specifies the command to run the Flask application.

Setting up Docker Compose
Now that we have our Flask app and Dockerfile ready, we can create a docker-compose.yml file to define and manage our multi-container application.
In the project directory, create a file named docker-compose.yml and paste the following content:
version: '3'
services:
  app:
    build:
      context: .
      dockerfile: Dockerfile
    ports:
      - 5000:5000
    depends_on:
      - redis
  redis:
    image: redis
The docker-compose.yml file defines two services: app and redis. The app service is built using the Dockerfile in the current directory, exposing port 5000 and depending on the redis service. The redis service uses the official Redis Docker image.
Running the Application
With everything set up, we can now run our Flask app with Redis using Docker Compose.
- Run the following command to build and start the containers:
docker-compose upDocker Compose will build the Docker image based on the
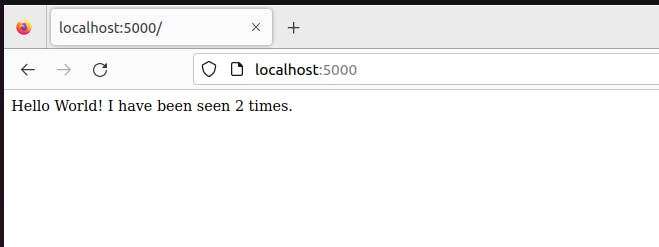
Dockerfileand start the Flask app and Redis containers.Once the containers are up and running, you can access the Flask app in your web browser by visiting
http://localhost:5000. You should see a "Hello World!" message along with the hit count.
Conclusion
In this tutorial, we learned how to use Docker Compose to run a Flask application with Redis. By defining the services and dependencies in a docker-compose.yml file, we can easily manage and deploy our multi-container application. Docker Compose simplifies the process of setting up the development environment, ensuring consistent deployments across different systems.
Happy Learning!!!